Klipper Upgrade
My cube 3d-printer is now capable of loading and unloading it’s single tool. (see this article). But sadly the motherboard used for this printer does not support enough motors to allow for actual tool changing. Thus I have looked into Klipper for the last few weeks. In this post I will describe my new setup and the different klipper settings that I needed to get my printer working again.
Orginial setup.
The old setup of my printer was based on a MKS genL board. This board handles all the motors for the XY motion, the dual Z screw, and the extruder. It also handles the bed and hotend heaters and fans, and the servo for the toolchanger.
| Motor port | Used for | Heater port | Used for | Other ports | Used for | ||
|---|---|---|---|---|---|---|---|
| Motor 1 | CoreXY 0 | Heater 0 | Heated Bed | Exp1 | Screen | ||
| Motor 2 | CoreXY 1 | Heater 1 | Hotend | Exp2 | Screen | ||
| Motor 3 | Z-screw 0 | Heater 2 | Unused | Servo1 | Tool changer | ||
| Motor 4 | Extruder 0 | Heater 3 | Part cooling fan | ||||
| Motor 5 | Z-screw 1 |
This results in the following schematic overview:
 As you can see, this board is getting pretty full. Especially considering I would need three more extruders and heaters.
Connecting Klipper
Klipper would allow us to use two motherboards, connected to a single computer to coordinate. For my printer I will use a raspberry pi 3, that is also running octoprint. With this setup we can use two different boards. Thus moving all the hotends and extruders to the second board. I would then have the following distribution:
| Motor port | Board 1 | Board 2 |
|---|---|---|
| Motor 1 | CoreXY 0 | Extruder 0 |
| Motor 2 | CoreXY 1 | Extruder 1 |
| Motor 3 | Z-screw 0 | Extruder 2 |
| Motor 4 | Extruder 3 | |
| Motor 5 | Z-screw 1 |
| Heater port | Board 1 | Board 2 |
|---|---|---|
| Heater 0 | Heated Bed | Hotend 0 |
| Heater 1 | Unused | Hotend 1 |
| Heater 2 | Unused | Hotend 2 |
| Heater 3 | Part cooling fan | Hotend 3 |
This would be enough to run the whole printer, we would even have some ports left over for more fan control.
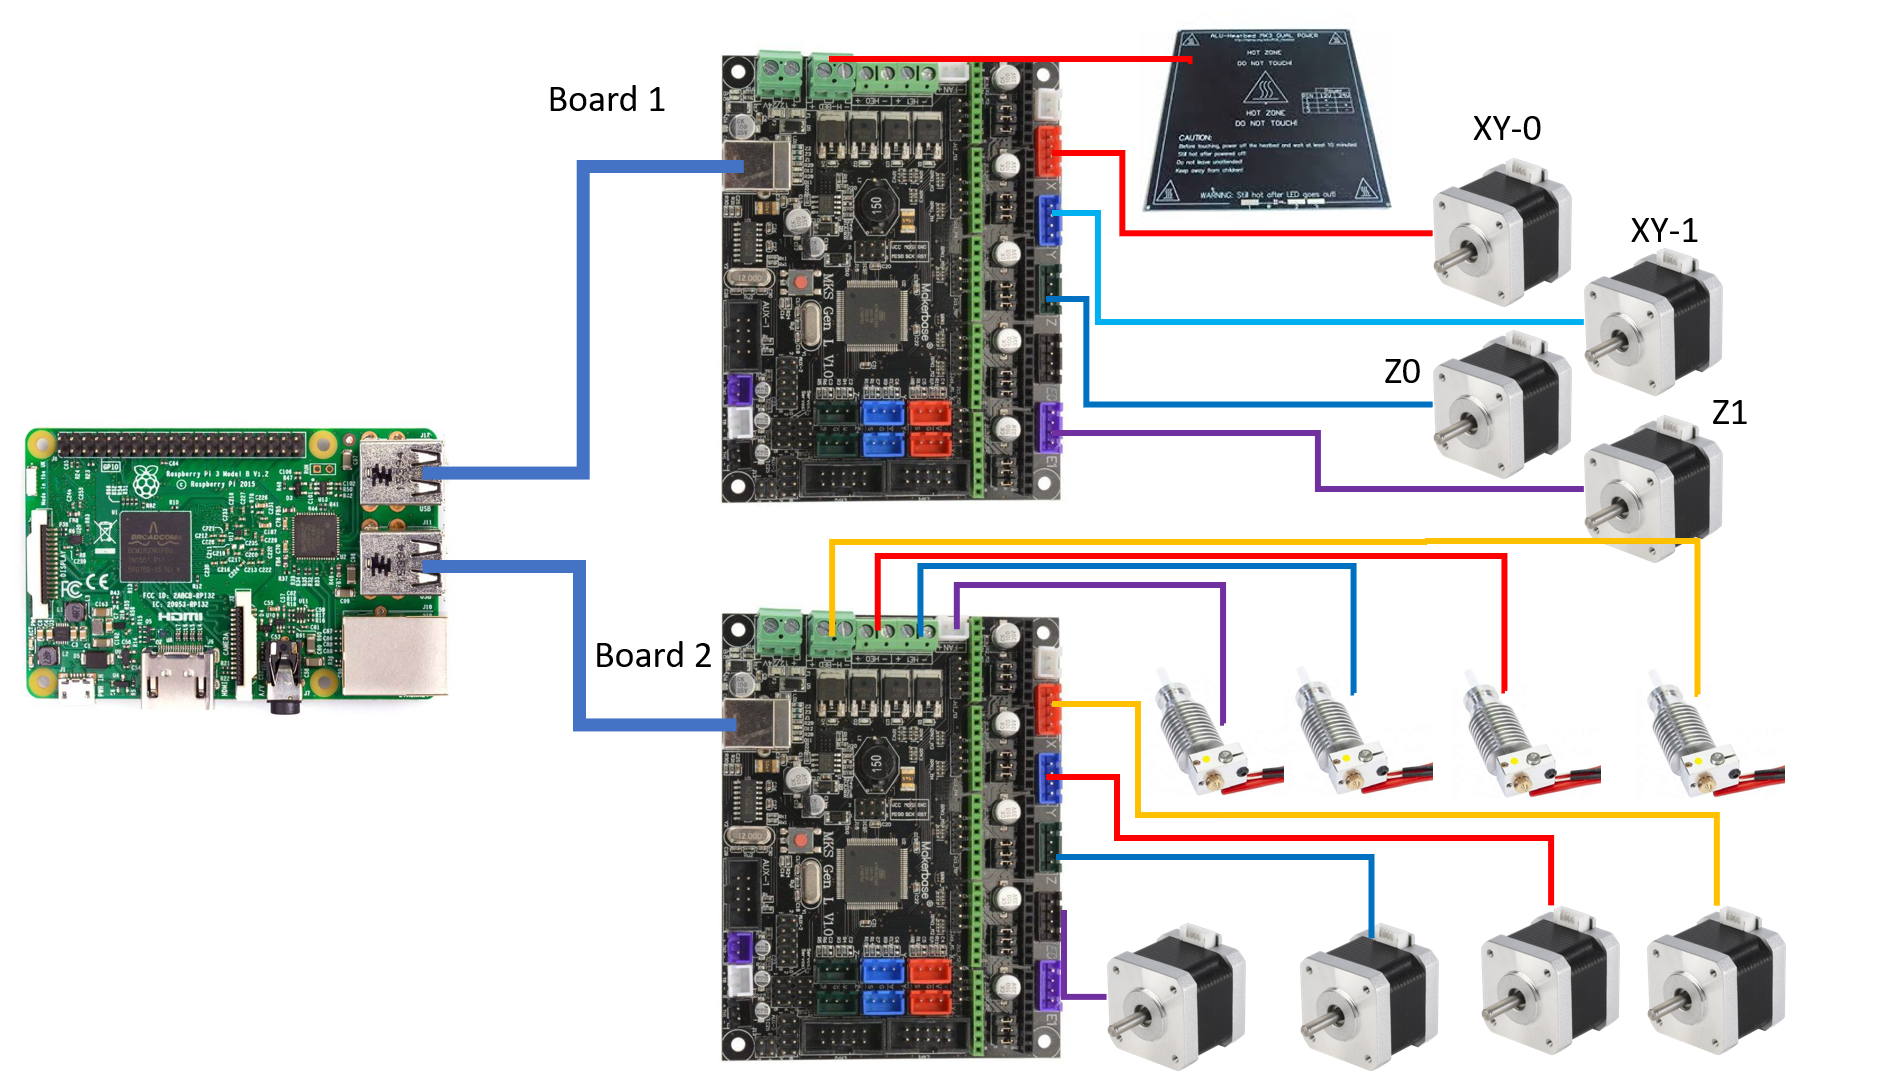 I have skipped all the other peripherals, they will remain on board 1.
Configuration
Now the final step was installing Klipper according to the installation instructions and configuring the printer. The final configuration can be found here.
One important aspect is that both boards have the same Serial ID. Thus instead of discerning the boards by ID, as suggested by the official instructions. I have discerned the boards based on their USB path. This means that the boards will have to be plugged in to the same usb port every time.
The rest of the settings have been lifted from the default RAMPS configurations. The Tool changing Macro’s are a work in progress and I will have to test them further when I have more then one hotend.
Finally I configured the raspberry pi 3 to not supply power to it’s USB ports. Thus when the printer is turned off, the boards are also off, but the Pi can remain on. This was done using the hub-ctrl.c as suggested in this post I used:
hub-ctrl.c/hub-ctrl -h 0 -P 2 -p 0
To turn off the power to the all the usb ports. This is adequate for now, but it dissalows a usb-webcam.
Conclusion
The printer is working again. Now with 2 motherboards and klipper installed. With only this upgrade the printer might have gotten a bit faster, as the printer can make more steps per second now. The next step will be installing a second hotend and configuring Klipper to support tool changing.